White Paper Crane Wall Lamp - Vinlighting

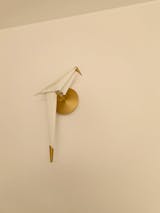
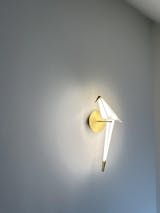
White Paper Crane Wall Lamp

SKU: Vin-WA00801
Availability: In Stock
$325.00
$325.00

🛒 Coupon: XMAS15 | Celebrate the Season with 15% Off – Hurry, Offer Ends Dec 15! 🎄

width="720" height="210" /

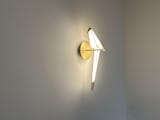
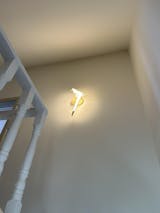
Experience the Paper Crane Wall Lamp—a harmonious blend of art and illumination. Rising from its rich, golden base, the simple yet elegant structure leads to the delicate form of an origami-inspired paper crane shade. Casting warm, diffused light, it creates an atmosphere of peaceful serenity in any setting.

If you have any questions about our products, please get in touch with us and we will get back to you within 24 hours.

Product Size

Size: Dia 35cm x H 55cm / Ø 13.7″ x H 21.6″

Details

Material: Brass / PC / Carbon Steel.

Process: Polishing / Lacquer.

Light source: LED bulb or Edison bulb.

Light source base type: LED(Average lifespan of 50,000 hours).

Kelvin range: Warm Light (3000K).

Power: Max 40W.

Voltage: AC 110-240V.

Environment: Suitable for indoor use.

Wiring: Hardwired.

Adjustable: No.

Control method: Compatible with common wall switches (not included).


Installing Wall Sconces: A Guide by Vinlighting

Wall sconces are a beautiful addition to any room, providing both ambient and accent lighting that can transform the atmosphere of your space. Whether you’re adding sconces to your living room, hallway, or bathroom, Vinlighting has created this step-by-step guide to help you install your wall sconces safely and effectively.

1. Choose the Right Wall Sconce for Your Space

Choosing the appropriate wall sconce for your room ensures that it complements the space and provides adequate lighting:
  • Style and Size: Consider the overall design of the room. Sleek, minimalist sconces can suit modern spaces, while ornate sconces may be more fitting for traditional decor. Select a size that complements the scale of the wall and other furniture.
  • Lighting Purpose: Determine the function of the sconce. Will it serve as accent lighting, task lighting, or a primary source of illumination? This can influence the type of light bulb and fixture style you choose.
  • Placement: Identify where you’ll place the sconces to enhance the room’s aesthetics and lighting. For hallways or bedside lighting, two or more matching sconces may create balance. For bathrooms, place sconces at eye level on either side of a mirror to minimize shadows.

2. Prepare for Installation

Gather the necessary tools and ensure a safe working environment before beginning installation:
  • Tools Needed: A screwdriver, ladder, voltage tester, wire connectors, and power drill (if necessary).
  • Turn Off Power: Always start by turning off the power to the room at the breaker box. Use a voltage tester to confirm there’s no power in the wires. If you’re replacing an old fixture, carefully remove it by unscrewing and disconnecting the wires.
This step helps you avoid electrical hazards and ensures a smooth installation process.

3. Install the Mounting Bracket

The mounting bracket is essential for securing the wall sconce to the wall:
  • Secure the Bracket: Attach the mounting bracket to the wall junction box with the screws provided, ensuring it’s aligned and stable. This will provide the foundation for the sconce.
  • Check Stability: Double-check that the bracket is firmly attached, as it will need to support the weight of the sconce. For larger or heavier sconces, make sure the bracket and wall box can handle the weight or consider additional reinforcement.

4. Connect the Wiring

Wiring is a critical step in the installation process. Match the wires according to their function:
  • Black Wire: Connects to the live (hot) wire.
  • White Wire: Connects to the neutral wire.
  • Green or Bare Copper Wire: Connects to the ground wire.

Instructions:

1. Attach the Ground Wire: Start by connecting the green or bare copper wire from the wall sconce to the ground wire in the wall junction box. Secure them with a wire connector.
2. Connect the Neutral Wires: Twist together the white wire from the sconce fixture with the white wire from the wall and secure with a wire connector.
3. Connect the Live Wires: Twist together the black wire from the sconce fixture with the black wire from the wall, securing with a wire connector.

Ensure that all wire connections are secure and covered with wire connectors. If unsure about wiring, consider consulting a licensed electrician to ensure safe handling.

5. Attach the Wall Sconce Fixture

With the wiring complete, carefully attach the wall sconce to the mounting bracket:
  • Secure the Fixture: Position the sconce fixture onto the mounting bracket and use the provided screws or nuts to secure it in place. Make sure it is level and aligned according to your preference.
  • Final Check for Alignment: Ensure the sconce is correctly positioned on the wall and that it hangs level. Adjustments can be made before fully tightening the screws.

6. Install Light Bulbs and Covers

Complete the setup by installing the light bulbs and any additional shades or covers:
  • Insert Bulbs: Install the recommended bulbs for your sconce, ensuring they are the correct wattage and type as specified by the manufacturer.
  • Attach Shades or Covers: If your wall sconce includes shades, covers, or decorative glass, attach them now. Make sure they are securely fastened and correctly aligned.
This step completes the fixture’s assembly, enhancing both functionality and appearance.

7. Test the Installation

It’s time to see your new wall sconce in action!
  • Restore Power: Go to the breaker box and turn the power back on for the room.
  • Test the Light: Flip the wall switch to make sure the sconce lights up properly. If it works correctly and looks secure, your installation is complete!
  • Final Adjustments: If needed, make any last adjustments to the fixture's alignment or position to ensure it looks perfect.

8. Additional Tips for Wall Sconce Installation

  • Consider Placement Height and Spacing: For optimal lighting and visual appeal, place sconces at the right height. Generally, eye level (about 5-6 feet from the floor) works well, but you may need to adjust based on ceiling height or the sconce’s intended function.
  • Ensure the Wall Box Can Support the Fixture’s Weight: For heavier sconces, ensure the wall junction box and mounting bracket can support the fixture’s weight. Additional reinforcement may be required for larger fixtures.
  • Seek Professional Help if Needed: If you’re unsure about wiring or mounting, hiring a licensed electrician can provide a safe and secure installation. This is especially important for wiring-intensive or heavy installations.
Vinlighting hopes this guide helps you install your new wall sconces, adding both elegance and functionality to your home. Wall sconces not only enhance your lighting but also contribute to the ambiance and style of your room. Happy installing!
At Vinlighting, we’re here to make sure your lighting fits your unique style and space perfectly. Our skilled in-house team is ready to customize your order with precision and care.

Popular Customization Options

  • Adjust Hanging Length: Perfect for high ceilings or cozy spaces.
  • Choose Your Material Color or Finish: From sleek copper to elegant matte black.
  • Select Emitting Colors: Warm white, neutral, or cool light to suit your mood.
  • Add Dimming Features: Control brightness for the perfect ambiance.
  • Resize to Your Needs: Scale up or down to match your room’s dimensions.
  • Redesign from Scratch: Share your ideas, and we’ll craft a lighting fixture just for you!

What We Offer

  • Minor Adjustments: Quick and easy tweaks to get it just right.
  • Professional CAD Drawings: Visualize your custom design with expert precision.
  • 3D Rendering: See how your custom light will look in your space before it’s built!
  • HD Product Photos: Get detailed, high-quality images to ensure your customization needs are fully met.

Talk to Our Experts

Need advice or have a special request? We’re here to help:
  • Live Chat: Connect with us from 9 AM to 6 PM EST.
  • Email Us: Leave a message, and we’ll get back to you promptly.
Let’s make your lighting uniquely yours! 🌟

Shipping Made Simple

We’ve got you covered with easy and reliable shipping options:
  • Free Standard Shipping (4-6 weeks): Available for all orders in the US and Canada.
  • Expedited Shipping (2-4 weeks): Faster delivery is available—check our Shipping Policy for costs.

Hassle-Free Returns

Your satisfaction is our priority! If you’re not completely happy with your purchase, you can return it within 30 days in new and unused condition for a full refund. (Please note: Paid shipping fees are non-refundable as fulfillment has already been completed.)

To start a return, just email our support team at support@vinlighting.com, and we’ll walk you through the process step by step. For more details, visit our Returns Policy.

Shop with confidence, knowing we’re here to make things right!
White Paper Crane Wall Lamp - Vinlighting

White Paper Crane Wall Lamp

$325.00
$325.00

White Paper Crane Wall Lamp

$325.00
Size: Dia 35cm x H 55cm / Ø 13.7″ x H 21.6″
Color: Brass & White
Kelvin range: Warm Light (3000K)